自動水やり器の制作

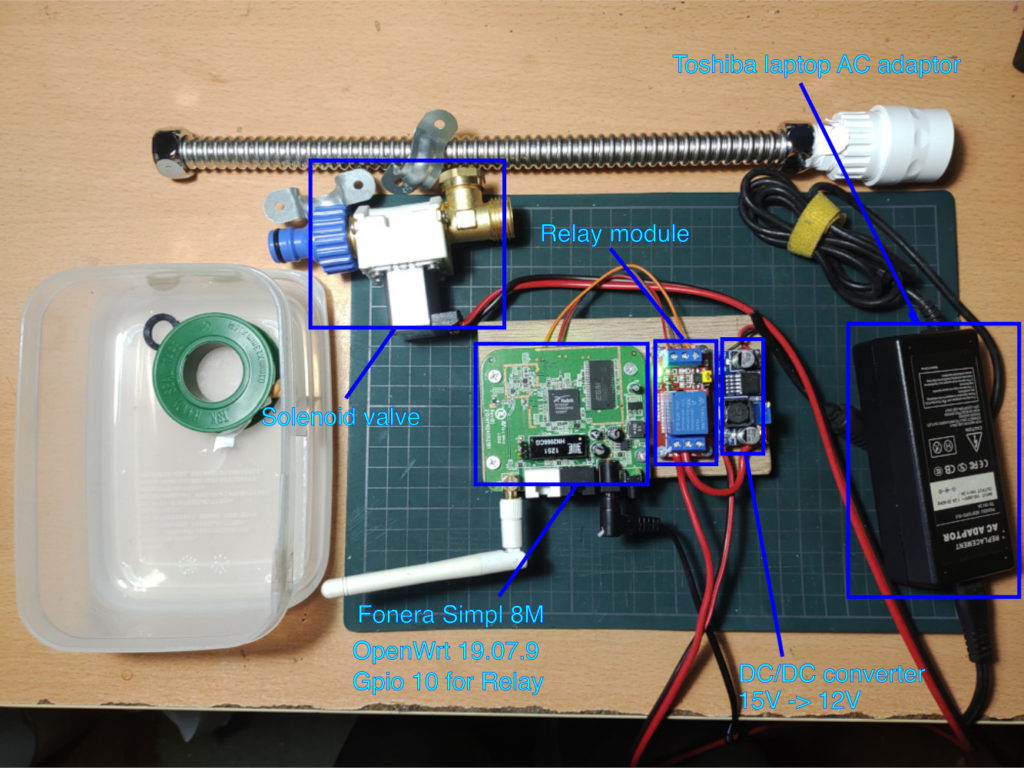
Fonera Simpl(fon2405e 8M)を使って自動水やりシステム器の制作をしました。Fonera Simplは以前にSPIフラッシュを換装してOpenWrtをインストールしたものを使います。今回、リセットボタンのgpioを使うのでDTSを修正して使います。

cronでシェルスクリプトを起動させて稼働させます。

#!/bin/sh

GPIO='/sys/devices/platform/gpio-leds/leds/switch1/brightness'
#TMPF='/tmp/tap.log'
#DATE=`date -I'seconds'`
MINS=$1

if [ -z "$1" ]; then
  MINS=1
elif [ "$1" -gt "3" ]; then  # MAX 3min
  MINS=5
fi

STATE=`cat $GPIO`
if [ "$STATE" -ne "0" ] ; then
  echo 0 > $GPIO
  logger -p notice -t tap "start"
#  water_control.sh &
  sleep $(( $MINS * 60 ))
fi

STATE=`cat $GPIO`
if [ "$STATE" -eq "0" ] ; then
  echo 255 > $GPIO
  logger -p notice -t tap "stop"
fi

STATE=`cat $GPIO`
if [ "$STATE" -ne "255" ] ; then
  logger -p err -t tap "tap malfunction"  
fi

さらに天気に合わせて水やりをコントロールしてみます。

#!/bin/sh

GPIO='/sys/devices/platform/gpio-leds/leds/switch1/brightness'

tap_off () {
  echo 255 > $GPIO
  logger -p notice -t tap "stop"
}

get_data () {
  DATA=`wget -q -O - 'https://api.openweathermap.org/data/2.5/onecall?lat=35.4761&lon=139.2810&units=metric&lang=en&exclude=minutely&appid=**********************'`
  TEMP=`echo $DATA | jq ".daily[0].temp.day"`
  PREC=`echo $DATA | jq ".daily[0].rain"`
}

get_data || exit

if [ "$PREC" = "null" ]; then
    PREC=0
fi

if [ `echo $TEMP'<'10 | bc` -eq "1" ] && [ `echo $PREC'>'1 | bc` -eq "1" ]; then
    sleep 30
    tap_off
elif [ `echo $TEMP'<'10 | bc` -eq "1" ] && [ `echo $PREC'<='2 | bc` -eq "1" ]; then
    sleep 45
    tap_off
elif [ `echo $TEMP'<'20 | bc` -eq "1" ] && [ `echo $PREC'>'2 | bc` -eq "1" ]; then
    sleep 45
    tap_off
elif [ `echo $TEMP'<'20 | bc` -eq "1" ] && [ `echo $PREC'<='2 | bc` -eq "1" ]; then
    sleep 60
    tap_off
elif [ `echo $TEMP'<'30 | bc` -eq "1" ] && [ `echo $PREC'>'2 | bc` -eq "1" ]; then
    sleep 60
    tap_off
fi

logger -p notice -t tap "Temp: ${TEMP}  Precipitation: $PREC"

Posted in DIY, OpenWrt | Comments Off on 自動水やり器の制作

Orange Pi R1のArmbianを使ったルータの設定

/boot/armbianEnv.txt

extraargs=net.ifnames=0
net.ipv6.conf.all.disable_ipv6=1
net.ipv6.conf.default.disable_ipv6=1

iw phy1 info

# iw phy1 info
Wiphy phy1
	wiphy index: 1
	max # scan SSIDs: 9
	max scan IEs length: 2304 bytes
	max # sched scan SSIDs: 0
	max # match sets: 0
	Retry short limit: 7
	Retry long limit: 4
	Coverage class: 0 (up to 0m)
	Supported Ciphers:
		* WEP40 (00-0f-ac:1)
		* WEP104 (00-0f-ac:5)
		* TKIP (00-0f-ac:2)
		* CCMP-128 (00-0f-ac:4)
		* CMAC (00-0f-ac:6)
	Available Antennas: TX 0 RX 0
	Supported interface modes:
		 * IBSS
		 * managed
		 * AP
		 * P2P-client
		 * P2P-GO
	Band 1:
		Capabilities: 0x1962
			HT20/HT40
			Static SM Power Save
			RX HT20 SGI
			RX HT40 SGI
			RX STBC 1-stream
			Max AMSDU length: 7935 bytes
			DSSS/CCK HT40
		Maximum RX AMPDU length 65535 bytes (exponent: 0x003)
		Minimum RX AMPDU time spacing: 16 usec (0x07)
		HT Max RX data rate: 150 Mbps
		HT TX/RX MCS rate indexes supported: 0-7
		Bitrates (non-HT):
			* 1.0 Mbps
			* 2.0 Mbps
			* 5.5 Mbps
			* 11.0 Mbps
			* 6.0 Mbps
			* 9.0 Mbps
			* 12.0 Mbps
			* 18.0 Mbps
			* 24.0 Mbps
			* 36.0 Mbps
			* 48.0 Mbps
			* 54.0 Mbps
		Frequencies:
			* 2412 MHz [1] (20.0 dBm)
			* 2417 MHz [2] (20.0 dBm)
			* 2422 MHz [3] (20.0 dBm)
			* 2427 MHz [4] (20.0 dBm)
			* 2432 MHz [5] (20.0 dBm)
			* 2437 MHz [6] (20.0 dBm)
			* 2442 MHz [7] (20.0 dBm)
			* 2447 MHz [8] (20.0 dBm)
			* 2452 MHz [9] (20.0 dBm)
			* 2457 MHz [10] (20.0 dBm)
			* 2462 MHz [11] (20.0 dBm)
			* 2467 MHz [12] (20.0 dBm)
			* 2472 MHz [13] (20.0 dBm)
			* 2484 MHz [14] (30.0 dBm)
	Supported commands:
		 * new_interface
		 * set_interface
		 * new_key
		 * start_ap
		 * new_station
		 * set_bss
		 * join_ibss
		 * set_pmksa
		 * del_pmksa
		 * flush_pmksa
		 * remain_on_channel
		 * frame
		 * set_channel
		 * connect
		 * disconnect
	WoWLAN support:
		 * wake up on anything (device continues operating normally)
	software interface modes (can always be added):
	interface combinations are not supported
	Device supports SAE with AUTHENTICATE command
	Device supports scan flush.
	max # scan plans: 1
	max scan plan interval: -1
	max scan plan iterations: 0
	Supported TX frame types:
		 * IBSS: 0x00 0x10 0x20 0x30 0x40 0x50 0x60 0x70 0x80 0x90 0xa0 0xb0 0xc0 0xd0 0xe0 0xf0
		 * managed: 0x00 0x10 0x20 0x30 0x40 0x50 0x60 0x70 0x80 0x90 0xa0 0xb0 0xc0 0xd0 0xe0 0xf0
		 * AP: 0x00 0x10 0x20 0x30 0x40 0x50 0x60 0x70 0x80 0x90 0xa0 0xb0 0xc0 0xd0 0xe0 0xf0
		 * AP/VLAN: 0x00 0x10 0x20 0x30 0x40 0x50 0x60 0x70 0x80 0x90 0xa0 0xb0 0xc0 0xd0 0xe0 0xf0
		 * P2P-client: 0x00 0x10 0x20 0x30 0x40 0x50 0x60 0x70 0x80 0x90 0xa0 0xb0 0xc0 0xd0 0xe0 0xf0
		 * P2P-GO: 0x00 0x10 0x20 0x30 0x40 0x50 0x60 0x70 0x80 0x90 0xa0 0xb0 0xc0 0xd0 0xe0 0xf0
	Supported RX frame types:
		 * IBSS: 0xd0
		 * managed: 0x40 0xb0 0xd0
		 * AP: 0x00 0x20 0x40 0xa0 0xb0 0xc0 0xd0
		 * AP/VLAN: 0x00 0x20 0x40 0xa0 0xb0 0xc0 0xd0
		 * P2P-client: 0x40 0xd0
		 * P2P-GO: 0x00 0x20 0x40 0xa0 0xb0 0xc0 0xd0
	Supported extended features:
# ufw allow in proto udp to 224.0.0.1
# ufw allow out proto udp to 224.0.0.1
ufw allow http
ufw allow ssh
sudo ufw allow in proto udp to 224.0.0.0/4
sudo ufw allow in proto udp from 224.0.0.0/4
# allow IGMP
-A ufw-before-input -p igmp -d 224.0.0.0/4 -j ACCEPT
-A ufw-before-output -p igmp -d 224.0.0.0/4 -j ACCEPT

update-alternatives –set iptables /usr/sbin/iptables-legacy

setenv bootargs "root=${rootdev} rootwait rootfstype=${rootfstype} ${consoleargs} hdmi.audio=EDID:0 disp.screen0_output_mode=${disp_mode} consoleblank=0 loglevel=${verbosity} ubootpart=${partuuid} ubootsource=${devtype} usb-storage.quirks=${usbstoragequirks} ${extraargs} ${extraboardargs} mem=256M"
mkimage -A arm -O linux -T script -C none -a 0 -e 0 -d boot.cmd boot.scr
# cat /sys/class/thermal/thermal_zone*/temp
51578
# cat /sys/devices/system/cpu/cpufreq/policy0/stats/trans_table
   From  :    To
         :    480000    648000    816000    960000   1008000
   480000:         0         5         1         2         0
   648000:         5         0        13         5         2
   816000:         3        12         0        11        28
   960000:         0         5        11         0        13
  1008000:         0         4        29        11         0
ENABLE=true
MIN_SPEED=480000
MAX_SPEED=816000
#MAX_SPEED=1400000
GOVERNOR=ondemand
#GOVERNOR=conservative
#GOVERNOR=performance
ZRAM_PERCENTAGE=40
SWAP_ALGORITHM=lzo
SIZE=30M
vm.overcommit_memory = 2
  • https://wiki.archlinux.jp/index.php/Systemd-networkd
    • https://docs.raspap.com
  • http://uglyduck.vajn.icu/PDF/sbc/OrangePi_R1_H2_UM_v0.9.1.pdf
  • https://github.com/lwfinger/rtl8188eu/issues/257
  • https://forum.armbian.com/topic/8237-serial-console-access-via-usb-uartgadget-mode-on-linuxwindowsosx/
  • https://forum.armbian.com/topic/10822-orange-pi-pc-usb-otg-not-working/
  • https://einar.slaskete.net/2014/05/03/allow-multicast-and-igmp-with-ufw-for-iptv-to-work/
    • https://forum.armbian.com/topic/12647-orange-pi-zero-freezing-randomly/
    • https://armadillo.atmark-techno.com/howto/u-boot-script
Posted in Armbian, Linux | Comments Off on Orange Pi R1のArmbianを使ったルータの設定

Thinkpad x230i: macOS Big Surのセットアップ

Screenshot

x260のmacOSインストールの時に調べていたらx230でもBig Surが使えそうなことがわかったのでインストールしてみました。

x230とx230iは若干の仕様が異なっていてインストーラーが起動しませんでした。

調べてみるとHfsPlusLegacy.efiをOCに入れればインストーラーが起動できました。

参考

  • https://github.com/banhbaoxamlan/X230-Hackintosh/releases/tag/v0.7.1M
  • https://github.com/acidanthera/OcBinaryData/blob/master/Drivers/HfsPlusLegacy.efi
  • https://github.com/Neelakurinji123/Thinkpad-x230i-EFI
Posted in macOS, ThinkPad | Comments Off on Thinkpad x230i: macOS Big Surのセットアップ

Thinkpad x260: macOS Big Surのセットアップ

Screenshot

OpenCore Legacy Patcherを使ってmacOS Big SurをダウンロードしUSBインストールを作成します。

EFIをマウントしてx260用のEFIをコピーします。

vagrant

% brew install --cask virtualbox
% brew install vagrant
% brew install libiconv gcc libvirt
% /opt/vagrant/embedded/bin/ruby --version
ruby 3.1.4p223 (2023-03-30 revision 957bb7cb81) [x86_64-darwin]
% brew info libvirt
==> libvirt: stable 9.5.0 (bottled), HEAD
% CONFIGURE_ARGS='with-ldflags=-L/opt/vagrant/embedded/lib with-libvirt-include=/usr/local/Cellar/libvirt/9.5.0/include with-libvirt-lib=/usr/local/lib' \
GEM_HOME=~/.vagrant.d/gems/3.1.4 \
GEM_PATH=$GEM_HOME:/opt/vagrant/embedded/gems \
PATH=/opt/vagrant/embedded/bin:$PATH \
vagrant plugin install vagrant-libvirt
% CONFIGURE_ARGS='with-ldflags=-L/opt/vagrant/embedded/lib with-libvirt-include=/usr/local/Cellar/libvirt/9.5.0/include with-libvirt-lib=/usr/local/lib' \
GEM_HOME=~/.vagrant.d/gems/3.1.4 \
GEM_PATH=$GEM_HOME:/opt/vagrant/embedded/gems \
vagrant plugin install vagrant-disksize
% CONFIGURE_ARGS='with-ldflags=-L/opt/vagrant/embedded/lib with-libvirt-include=/usr/local/Cellar/libvirt/9.5.0/include with-libvirt-lib=/usr/local/lib' \
GEM_HOME=~/.vagrant.d/gems/3.1.4 \
GEM_PATH=$GEM_HOME:/opt/vagrant/embedded/gems \
vagrant plugin install vagrant-vbguest
% vagrant destroy
% vagrant init
% vagrant box add generic/ubuntu2204
% vagrant box update
% vagrant box list
% vagrant status
% vagrant up
% vagrant ssh
% vagrant halt
Vagrant.configure("2") do |config|
  config.vm.box = "generic/ubuntu2204"
end

vagrant basic command

  • https://www.drupal.org/node/2008794
  • https://qiita.com/0ta2/items/69c2378600bf8adaac5c

Libvritを使った接続はネットワークのみになります。

 virsh -V
Virsh command line tool of libvirt 9.1.0
See web site at https://libvirt.org/

Compiled with support for:
 Hypervisors: QEMU/KVM VMware VirtualBox ESX Test
 Networking: Remote Network Bridging
 Storage: Dir iSCSI-direct ZFS
 Miscellaneous: Daemon Secrets Debug Readline
Vagrant.configure("2") do |config|
  config.vm.box = "generic/debian10"
  config.vm.provider :libvirt do |libvirt|
    libvirt.host = "USER@IP_ADDRESS"
    libvirt.connect_via_ssh = true
  end
end

wine

% brew install --cask --no-quarantine gcenx/wine/wine-crossover
% brew install winetricks
% wineboot --init
% winetricks winxp
% winetricks corefonts # または allfonts
% wget 'https://download.microsoft.com/download/E/4/1/E4173890-A24A-4936-9FC9-AF930FE3FA40/NDP461-KB3102436-x86-x64-AllOS-ENU.exe'
% wine ./NDP461-KB3102436-x86-x64-AllOS-ENU.exe /q
#% brew install --cask xquartz # Optional

MS Officeのインストールは別途に環境設定をします。

% WINEPREFIX=$HOME/msoffice wineboot --init
% WINEPREFIX=$HOME/msoffice winecfg # xp
% WINEPREFIX=$HOME/msoffice wine setup.exe
% WINEPREFIX=$HOME/msoffice wine office2007{sp1..sp3}-kb******-fullfile-en-us.exe /passive
% WINEPREFIX=$HOME/msoffice winetricks msxml3
% WINEPREFIX=$HOME/msoffice winetricks allfonts

winecfgでライブラリの設定をします。

[Libraries]
msxml3 -> native
gdiplus -> native
riched20 -> native

Script Editorで起動スクリプトを作ります。

on run
	
	--edit this to be the correct location and file to run (typically only edit after the "drive_c")
	-- WINEPREFIX=$HOME/msoffice wine  $HOME/msoffice/drive_c/Program\ Files\ \(x86\)/Microsoft\ Office/Office12/EXCEL.EXE 
	set toRun to "$WINEPREFIX/drive_c/Program Files (x86)/Microsoft Office/Office12/EXCEL.EXE"
	
	--edit winePrefix if you are not using the default prefix
	set winePrefix to "$HOME/msoffice"
	
	--edit wineLocation if your wine install is not the default location
	set wineLocation to "/usr/local/bin"
	
	-- With workaround for broken FreeType 2.7 rendering by switching to renderer from FreeType 2.6
	-- export FREETYPE_PROPERTIES="truetype:interpreter-version=35"
	-- See comment from Lucian Poston here: https://bugs.winehq.org/show_bug.cgi?id=41639 
	
	-------------------------------------------------------
	--DO NOT EDIT ANYTHING BELOW THIS LINE
	-------------------------------------------------------
	set toRunPath to do shell script "WINEPREFIX=\"" & winePrefix & "\"; TEMPVAR=\"" & toRun & "\"; echo \"${TEMPVAR%/*}\""
	set toRunFile to do shell script "WINEPREFIX=\"" & winePrefix & "\"; TEMPVAR=\"" & toRun & "\"; TEMPVAR2=\"" & toRunPath & "\"; echo \"${TEMPVAR#$TEMPVAR2/}\""
	do shell script "PATH=\"" & wineLocation & ":$PATH\"; export FREETYPE_PROPERTIES=\"truetype:interpreter-version=35\"; export WINEPREFIX=\"" & winePrefix & "\"; cd \"" & toRunPath & "\"; wine \"" & toRunFile & "\" > /dev/null 2>&1 &"
	
end run

File formatをApplicationで保存します。アイコンを登録するとこんな感じになります。

Screenshot

cups

MS Office 2007でも印刷もできます。

ネットワークプリンター(p910nd)に接続する設定です。

まずWebインターフェースを有効にします。

% sudo cupsctl WebInterface=yes

または

#WebInterface No
WebInterface Yes

ghostscriptをインストールします。

% brew install ghostscript --build-from-source

ghostscriptを使ってテストしてみます。

% gs -q -dSAFER -dNOPAUSE -dBATCH -sDEVICE=rpdl -r600x600 -sPAPERSIZE=a4 \
     -sOutputFile=test.bin ThinkPad_X260_Spec.pdf
% cat test.bin | nc  [ネットワークプリンタのIP] 9100

次にfoomatic-ripをインストールします。Big Surの場合はインストーラーのエラーで直接インストールができないのでアーカイブを解凍してインストールします。

% wget https://www.openprinting.org/download/printdriver/macosx/foomatic-rip-4.0.6.230.dmg
% sudo -s
# 7z x foomatic-rip-4.0.6.230.dmg
# cd Foomatic-RIP\ 4.0.6/Foomatic-RIP.pkg/Contents
# gunzip -dc Archive.pax.gz > Archive.pax
# cpio -i <Archive.pax
# cp -a ./usr/libexec/cups/backend/beh /usr/libexec/cups/backend
# cp -a ./usr/libexec/cups/filter/foomatic-rip /usr/libexec/cups/filter/
# cp -a ./usr/local/bin/foomatic-rip /usr/local/bin/
# cp -a ./usr/local/bin/foomatic-rip-PanTig /usr/local/bin/
# cp -a ./usr/local/etc/foomatic /usr/local/etc/
# cp -a ./usr/local/share/man/man1/foomatic-rip.1 /usr/local/share/man/man1/

Foomatic-RIPをCUPSで使えるようにします。

% sudo sh -c 'echo "Sandboxing Relaxed" >> /etc/cups/cups-files.conf'

cupsを再起動します。

% sudo launchctl stop org.cups.cupsd
% sudo launchctl start org.cups.cupsd

ブラウザからアクセスしてプリンターを追加します。

  • Access: http://localhost:631
  • Add Printer: Internet Printing Protocol (http), Connection: socket://[remote PC]:9100
  • Select PPD File: (example)Ricoh-RPDL_IV_Laser_Printer-rpdl.ppd

サードパーティーのKextの再インストール

HoRNDISをインストールしようとして操作を間違えて起動できない状態になりました。そこでサイトを参考にして手直ししたのですがうまくいきませんでした。

  • https://github.com/jwise/HoRNDIS/issues/132

Extension with identifiers com.joshuawise.kexts.HoRNDIS not approved to load. Please approve using System Preferences.

Big Surの場合は次のやり方が正解でした。

kmutil trigger-panic-medic --volume-root /Volumes/<YourVolumeName> in recovery mode
  • https://developer.apple.com/forums/thread/661240

参考

  • https://github.com/SuhailSherief/ThinkPad-x260-macOS-OpenCore
  • https://developer.hashicorp.com/vagrant/downloads
  • https://appdb.winehq.org/objectManager.php?sClass=version&iId=17886
  • https://lunar.computer/posts/vagrant-libvirt-macos/
  • https://github.com/SuhailSherief/ThinkPad-x260-macOS-OpenCore/issues/3
Posted in macOS, ThinkPad | Leave a comment

Thinkpad x260: macOS Montereyのセットアップ

オークションでThinkpad x260が手に入ったのでmacOS化しました。

Thinkpad x230はCatalinaまでなので、Catalinaのインストールから開始、でもPatcher使えば直接Montereyをインストールできるようです。

Catalinaのインストール用ファイルがAppleから落とせなかったのでmacOS Catalina Patcherを使いました。考えてみれば直にMontereyをPatcherを使ってインストールした方がよかったですね。

ということでx260にCatalinaが入ってしばらく置いておくとMontereyのインストールファイルがダウンロードされます。それを使ってUSBのインストールディスクを作りインストールしました。USB起動ディスクの作り方はまずVanillaのインストールディスクを作りそこのEFIパティションにx260が動くEFIを入れます。

あとは淡々とインストールを進めれば出来上がりです。

参考

  • https://pcsupport.lenovo.com/us/en/products/laptops-and-netbooks/thinkpad-x-series-laptops/thinkpad-x260/downloads/ds105890
  • https://psref.lenovo.com/syspool/Sys/PDF/ThinkPad/ThinkPad_X270/ThinkPad_X270_Spec.PDF
  • https://download.lenovo.com/pccbbs/mobiles_pdf/x260_hmm_en_sp40j72016_01.pdf
  • https://dosdude1.com/catalina/
  • https://www.reddit.com/r/hackintosh/comments/hy70zx/thinkpad_x260_catalina_10155_opencore_hackintosh/
  • https://openintelwireless.github.io/
  • https://www.tonymacx86.com/resources/categories/community-software.10/
  • https://github.com/rNiubo/Catalina-X260
  • https://www.tonymacx86.com/threads/airportitlwm-doesnt-work.309297/
  • https://github.com/corpnewt/ProperTree
  • https://github.com/SuhailSherief/ThinkPad-x260-macOS-OpenCore
  • https://iboysoft.com/howto/install-monterey-on-unsupported-mac.html
  • https://dosdude1.com/catalina/
  • https://github.com/OpenIntelWireless/IntelBluetoothFirmware
  • https://github.com/acidanthera/BrcmPatchRAM/releases

Posted in macOS, ThinkPad | Comments Off on Thinkpad x260: macOS Montereyのセットアップ

UPDATE: Forward Proxy: NaiveProxy + Caddy 2 + nginxのセットアップ

go 1.19.5のダウンロード

https://go.dev/dl/go1.19.5.linux-amd64.tar.gz

$ sudo -s
# tar xzvf go1.19.5.linux-amd64.tar.gz -C /usr/local/
# export PATH="/usr/local/go/bin:/usr/local/sbin:/usr/local/bin:/root/go/bin:$PATH"
# export GO111MODULE=on
# git clone -b naive https://github.com/klzgrad/forwardproxy
# go install github.com/caddyserver/xcaddy/cmd/xcaddy@latest
# ~/go/bin/xcaddy build --with github.com/caddyserver/forwardproxy=$PWD/forwardproxy --with github.com/caddy-dns/cloudflare
# mv ./caddy /usr/local/bin/caddy

Caddyの起動ファイルを作成します。

[Unit]
Description=Caddy
Documentation=https://caddyserver.com/docs/
After=network.target network-online.target
Requires=network-online.target

[Service]
Type=notify
User=caddy
Group=caddy
ExecStart=/usr/local/bin/caddy run --environ --config /etc/caddy/caddy.json
ExecReload=/usr/local/bin/caddy reload --config /etc/caddy/caddy.json
TimeoutStopSec=5s
LimitNOFILE=1048576
LimitNPROC=512
PrivateTmp=true
ProtectSystem=full
AmbientCapabilities=CAP_NET_BIND_SERVICE

[Install]
WantedBy=multi-user.target

systendにコピーします。

# cp caddy.service /lib/systemd/system/

caddyのユーザアカウントを作成します。

# adduser --system --no-create-home --group caddy

Caddy 2を起動します。

# systemctl daemon-reload
# systemctl enable caddy.service

クライアントの設定

最新のNaiveProxyをダウンロードします。

  • https://github.com/klzgrad/naiveproxy
$ xz -dc naiveproxy-v109.0.5414.74-1-mac-x64.tar.xz | tar xvf -

config.jsonを編集します。

{
  "listen": "socks://127.0.0.1:1080",
  "proxy": "https://user:pass@xxxxxxxx.example.com",
  "log": ""
}

NaiveProxyを起動しPorxyをSOCKS5で127.0.0.1:1080に設定してブラウザーを起動します。

Nginxの設定

sockを使う

stream {

      map $ssl_preread_server_name $name {
        xxxxxxxx.example.com    caddy;
      }

upstream caddy {
        server unix:/dev/shm/caddy-https.socket;
      }

      server {
        listen 443;
        proxy_connect_timeout 1s;
        proxy_timeout 4s;

        proxy_pass $name;
        ssl_preread on;
#        proxy_protocol on;
      }

      log_format basic '$ssl_preread_server_name $remote_addr [$time_local] '
         '$protocol $status $bytes_sent $bytes_received '
         '$session_time "$upstream_addr" '
         '"$upstream_bytes_sent" "$upstream_bytes_received" "$upstream_connect_time"';

      access_log /var/log/nginx/stream.access.log basic;
      error_log /var/log/nginx/stream.error.log;
}
server {
    listen        80;
    server_name   xxxxxxxx.example.com;

    proxy_set_header    X-Real-IP          $remote_addr;
    proxy_set_header    Host               $host;
    proxy_set_header    X-Forwarded-Proto  $scheme;
    proxy_set_header    X-Forwarded-For    $proxy_add_x_forwarded_for;

    location / {
        proxy_pass              http://127.0.0.1:88;
        proxy_read_timeout      240;
        proxy_buffering         off;
        proxy_redirect          off;
    }
}
{
    "admin": {
        "listen": ":3019",
        "disabled": true
    },
    "logging": {
        "logs": {
            "": {
                "writer": {
                    "output": "file",
                    "filename": "/var/log/caddy/caddy.log",
                    "roll": true,
                    "roll_size_mb": 50,
                    "roll_gzip": true,
                    "roll_local_time": false,
                    "roll_keep": 10,
                    "roll_keep_days": 90
                },
                "encoder": {"format": "json"},
                "level": "INFO"
            },
            "default": {
                "level": "INFO"
            }
        }
    },
    "apps": {
        "http": {
            "servers": {
                "httpserver": {
                    "listen": [":88"],
                    "routes": [{
                        "handle": [{
                            "handler": "static_response",
                            "headers": {"Location": ["https://xxxxxxxx.example.com/"]},
                            "status_code": 301
                        }]
                    }]
                },
                "fwdproxy": {
                    "listen": ["unix//dev/shm/caddy-https.socket"],
                    "logs": {},
                    "routes": [{
                        "handle": [{
                            "handler": "subroute",
                            "routes": [{
                                "handle": [
                                    {
                                        "allowed_ports": [
                                            443, 8004
                                        ],
                                        "auth_pass_deprecated": "xxxxxxxxxxxxxxxx",
                                        "auth_user_deprecated": "xxxxxxxx",
                                        "handler": "forward_proxy",
                                        "hide_ip":true,
                                        "hide_via":true,
                                        "probe_resistance":{
                                        }
                                    }
                                ]
                            }, {
                                "match": [{"host": ["xxxxxxxx.example.com"]}],
                                "handle": [{
                                    "handler": "file_server",
                                    "root": "/var/www/caddy"
                                }]
                            }]
                        }],
                        "terminal": true
                    }],
                    "tls_connection_policies": [{
                        "match": {"sni": ["xxxxxxxx.example.com"]},
                        "cipher_suites": ["TLS_AES_128_GCM_SHA256"],
                        "curves": ["x25519"]
                    }]
                }
            }
        },
        "tls": {
            "certificates": {
                "automate":[
                    "xxxxxxxx.example.com"
                ]
            }
        }
    }
}

lxc等のコンテナで使う

stream {

    map $ssl_preread_server_name $name {
        xxxxxxxx.example.com    caddy;
    }

    upstream caddy {
        server [2001:xxx:xxx:xx::xxxx:xx]:443;
    }

    server {
        listen      443;
        #listen      443 udp;
        #resolver 1.1.1.1;
        proxy_connect_timeout 1s;
        proxy_timeout 4s;

        proxy_pass $name;
        #proxy_protocol on;
        ssl_preread on;
    }

    log_format basic '$ssl_preread_server_name $remote_addr [$time_local] '
       '$protocol $status $bytes_sent $bytes_received '
       '$session_time "$upstream_addr" '
       '"$upstream_bytes_sent" "$upstream_bytes_received" "$upstream_connect_time"';

    access_log /var/log/nginx/stream.access.log basic;
    error_log /var/log/nginx/stream.error.log;

}
server {
    listen          80;
    server_name xxxxxxxx.example.com;
    location / {
        proxy_pass		http://[2001:xxx:xxx:xx::xxxx:xx]:80;
        proxy_read_timeout	240;
        proxy_buffering		off;
        proxy_redirect		off;
        proxy_set_header	X-Forwarded-Host	$host;
        proxy_set_header	X-Forwarded-Port	$server_port;
        proxy_set_header	X-Real-IP	$remote_addr;
        proxy_set_header	Host               $host;
        proxy_set_header	X-Forwarded-Proto  $scheme;
        proxy_set_header	X-Forwarded-For    $proxy_add_x_forwarded_for;
    }
}
{
    "admin": {
        "listen": ":3019",
        "disabled": true
    },
    "logging": {
        "logs": {
            "": {
                "writer": {
                    "output": "file",
                    "filename": "/var/log/caddy/caddy.log",
                    "roll": true,
                    "roll_size_mb": 50,
                    "roll_gzip": true,
                    "roll_local_time": false,
                    "roll_keep": 10,
                    "roll_keep_days": 90
                },
                "encoder": {"format": "json"},
                "level": "INFO"
            },
            "default": {
                "level": "INFO"
            }
        }
    },
    "apps": {
        "http": {
            "servers": {
                "httpserver": {
                    "listen": ["[::]:80"],
                    "routes": [{
                        "handle": [{
                            "handler": "static_response",
                            "headers": {"Location": ["https://xxxxxxxx.example.com/"]},
                            "status_code": 301
                        }]
                    }]
                },
                "fwdproxy": {
                    "listen": ["[::]:443"],
                    "listener_wrappers": [
                    ],
                    "logs": {},
                    "routes": [{
                        "handle": [{
                            "handler": "subroute",
                            "routes": [{
                                "handle": [
                                    {
                                        "allowed_ports": [
                                            443
                                        ],
                                        "auth_pass_deprecated": "xxxxxxxxxxxxxxxx",
                                        "auth_user_deprecated": "xxxxxxxx",
                                        "handler": "forward_proxy",
                                        "hide_ip":true,
                                        "hide_via":true,
                                        "probe_resistance":{
                                        }
                                    }
                                ]
                            }, {
                                "match": [{"host": ["xxxxxxxx.example.com"]}],
                                "handle": [{
                                    "handler": "file_server",
                                    "root": "/var/www/caddy"
                                }]
                            }]
                        }],
                        "terminal": true
                    }],
                    "tls_connection_policies": [{
                        "match": {"sni": ["xxxxxxxx.example.com"]},
                        "cipher_suites": ["TLS_CHACHA20_POLY1305_SHA256"],
                        "curves": ["x25519"]
                    }]
                }
            }
        },
        "tls": {
            "certificates": {
                "automate":[
                    "xxxxxxxx.example.com"
                ]
            }
        }
    }
}

参考

  • https://caddyserver.com/docs/api
  • https://github.com/klzgrad/naiveproxy
  • https://github.com/klzgrad/forwardproxy
  • https://cc2048.com/archives/95d3d41d.html
  • https://caddyserver.com/docs/caddyfile/directives/tls
  • https://go.dev/dl/
  • https://caddyserver.com/docs/json/
  • https://www.geefire.eu.org/2020/09/26/caddy-with-naiveproxy-compile.html
Posted in Linux | Leave a comment

OpenWrt for Amlogic s9xxx tv box based on Official firmware

OpenWrt for Amlogic s9xxx tv boxというGithubのプロジェクトがあったので入れてみました。中国版にカスタマイズされていたのでシンプル化して公式OpenWrtを入れられるようにフォークして手を加えました。

  • https://github.com/Neelakurinji123/openwrt-amlogic-s9xxx

TFカードにddコマンドで焼き付ければそのまま使えるのですが、2台eMMCが損傷しているTV BOXがブートできないようなので、eMMCを回避して外付けデバイスからブートできるオプションを付け加えました。

sudo ./make -d -b s905x -k 5.4.180 -t external

eMMCが損傷しているということはu-bootが起動できないということです。ということでフルバックアップがあることを前提に進めていきます。

amlogic製のSoCはデバイスの先頭から700MBくらいがシステム領域になっているので、バックアップイメージからtfカードにddを使って書き込みます。

dd if=backup.img of=/dev/mmcblkX bs=1M count=1000

作ったファームウェアのイメージを一時的にUSBドライブ等にコピーします。

gunzip -c openwrt_s905w_k5.4.184_2022.xx.xx.xxxx.img.gz | dd of=/dev/sdX bs=1M

fdiskを使ってパーティション情報を読み取ります。

fdisk -l /dev/sdX

EFI System Partitionはディスクの先頭から1GB先に作ります。そこから497663セクター作り、さらに2049先にrootfs用のパーティションを1996799セクター作ります。ddコマンドを使って2つのパーティションを上書きします。

Device                                      Boot  Start     End Sectors  Size Id Type
openwrt_s905w_k5.4.184_2022.03.16.0954.img1      133120  630783  497664  243M  c W95 FAT32 (LBA)
openwrt_s905w_k5.4.184_2022.03.16.0954.img2      632832 2629631 1996800  975M 83 Linux

TFカードをTV-BOXに挿入してブートします。

BusyBox v1.33.2 (2022-02-16 20:29:10 UTC) built-in shell (ash)

  _______                     ________        __
 |       |.-----.-----.-----.|  |  |  |.----.|  |_
 |   -   ||  _  |  -__|     ||  |  |  ||   _||   _|
 |_______||   __|_____|__|__||________||__|  |____|
          |__| W I R E L E S S   F R E E D O M
 -------------------------------------------------------
 Install: OpenWrt → System → Amlogic Service → Install
 Update: OpenWrt → System → Amlogic Service → Update
 Amlogic SoC: s905w
 OpenWrt Kernel: 5.4.184-flippy-70+o
 Packaged Date: 2022-03-15
 -------------------------------------------------------
root@OpenWrt30:~# fdisk -l
...
Disk /dev/mmcblk1: 29.34 GiB, 31499223040 bytes, 61521920 sectors
Units: sectors of 1 * 512 = 512 bytes
Sector size (logical/physical): 512 bytes / 512 bytes
I/O size (minimum/optimal): 512 bytes / 512 bytes
Disklabel type: dos
Disk identifier: 0x0436e4e9

Device         Boot   Start     End Sectors  Size Id Type
/dev/mmcblk1p1      1368064 1865727  497664  243M  c W95 FAT32 (LBA)
/dev/mmcblk1p2      1867776 3864575 1996800  975M 83 Linux

コマンドが足りないのでリポジトリから追加します。

opkg update && opkg install blkid fdisk lsblk mount-utils

追記

s912で安定稼動するv5.1.0を追加したのですがiptablesに不具合が出ます。ソースが手に入らず放置しました。

Posted in OpenWrt, tvbox | Comments Off on OpenWrt for Amlogic s9xxx tv box based on Official firmware

UPDATE: Kindle Weather Display for OpenWrt

SVGの勉強がてらに以前作った Kindle Weather Display for OpenWrt をアップデートしました。

https://github.com/Neelakurinji123/kindle-weather-display-for-openwrt

グラフの追加で新しいSVGコマンドを使いました。

追記

グラフにラマダン月オプションを作りました。pipでモジュールを追加します。

pip install hijri-converter
Posted in OpenWrt, python | Comments Off on UPDATE: Kindle Weather Display for OpenWrt

Forward Proxy: NaiveProxy + Caddy 2 + Nginx のセットアップ

前回はCaddy 2のセットアップをしました。実際はWebサーバーを組み合わせて使います。NginxをupstreamサーバにしてCaddyのバックエンドに接続します。

通常のコンテナまたは複数サイトで運用する場合

stream {

    map $ssl_preread_server_name $name {
        mx.example.com             mail_backend;
        forwardproxy.example.com   caddy;
    }

    upstream mail_backend {
        server 10.0.0.1:2443;
    }

    upstream caddy {
        server 10.0.0.1:443;
    }

    server {
        listen      443;
        #resolver 1.1.1.1;
        proxy_connect_timeout 1s;
        proxy_timeout 3s;

        proxy_pass $name;
        #proxy_protocol on;
        ssl_preread on;
    }

    log_format basic '$ssl_preread_server_name $remote_addr [$time_local] '
       '$protocol $status $bytes_sent $bytes_received '
       '$session_time "$upstream_addr" '
       '"$upstream_bytes_sent" "$upstream_bytes_received" "$upstream_connect_time"';

    access_log /var/log/nginx/stream.access.log basic;
    error_log /var/log/nginx/stream.error.log;
}

Caddyにポート80を振りました。証明書の取得に必要と思われます。

server {
    listen      80;
    server_name forwardproxy.example.com;
    location / {
        proxy_pass		http://10.0.0.1:80;
        proxy_read_timeout	240;
        proxy_buffering		off;
        proxy_redirect		off;
        proxy_set_header    X-Real-IP          $remote_addr;
        proxy_set_header    Host               $host;
        proxy_set_header    X-Forwarded-Proto  $scheme;
        proxy_set_header    X-Forwarded-For    $proxy_add_x_forwarded_for;
#        proxy_set_header    X-Forwarded-Host   $host;
#        proxy_set_header    X-Forwarded-Server $host;
    }
}

lxcのコンテナなのでNginxとCaddyのポートの競合は避けられます。

{
    "admin": {
        "listen": ":3019",
        "disabled": true
    },
    "logging": {
        "logs": {
            "": {
                "writer": {
                    "output": "file",
                    "filename": "/var/log/caddy/caddy.log",
                    "roll": true,
                    "roll_size_mb": 10,
                    "roll_gzip": true,
                    "roll_local_time": false,
                    "roll_keep": 10,
                    "roll_keep_days": 90
                },
                "encoder": {"format": "json"},
                "level": "INFO"
            },
            "default": {
                "level": "INFO"
            }
        }
    },
    "apps": {
        "http": {
            "servers": {
                "httpserver": {
                    "listen": ["[::]:80"],
                    "routes": [{
                        "handle": [{
                            "handler": "static_response",
                            "headers": {"Location": ["https://example.com/"]},
                            "status_code": 301
                        }]
                    }]
                },
                "fwdproxy": {
                    "listen": ["[::]:443"],
                    "listener_wrappers": [
                    ],
                    "logs": {},
                    "routes": [{
                        "handle": [{
                            "handler": "subroute",
                            "routes": [{
                                "handle": [
                                    {
                                        "allowed_ports": [
                                            443
                                        ],
                                        "auth_pass_deprecated": "pass",
                                        "auth_user_deprecated": "user",
                                        "handler": "forward_proxy",
                                        "hide_ip":true,
                                        "hide_via":true,
                                        "probe_resistance":{
                                        }
                                    }
                                ]
                            }, {
                                "match": [{"host": ["example.com"]}],
                                "handle": [{
                                    "handler": "file_server",
                                    "root": "/var/www/caddy"
                                }]
                            }]
                        }],
                        "terminal": true
                    }],
                    "tls_connection_policies": [{
                        "match": {"sni": ["example.com"]},
                        "cipher_suites": ["TLS_CHACHA20_POLY1305_SHA256"],
                        "curves": ["x25519"]
                    }]
                }
            }
        },
        "tls": {
            "certificates": {
                "automate":[
                    "example.com"
                ]
            }
        }
    }
}

Systemdユニットです。

[Unit]
Description=Caddy
Documentation=https://caddyserver.com/docs/
After=network.target network-online.target
Requires=network-online.target

[Service]
Type=notify
#User=root
#Group=root
User=caddy
Group=caddy
ExecStart=/usr/local/bin/caddy run --environ --config /etc/caddy/caddy.json
ExecReload=/usr/local/bin/caddy reload --config /etc/caddy/caddy.json
TimeoutStopSec=5s
LimitNOFILE=1048576
LimitNPROC=512
PrivateTmp=true
ProtectSystem=full
AmbientCapabilities=CAP_NET_BIND_SERVICE

[Install]
WantedBy=multi-user.target

OpenVZ Debian 9の場合

OpenVZの準仮想環境の場合はかなり手段が限られてきます。今回はUnix Domain Socketを使いました。

stream {

      map $ssl_preread_server_name $name {
        mail.example.com            mail_backend;
        www.example.com             www_backend;
        forwardproxy.example.com    caddy;
      }

      upstream mail_backend {
        server 127.0.0.1:81;
      }

      upstream www_backend {
        server 127.0.0.1:82;
      }

      upstream caddy {
        server unix:/dev/shm/caddy-https.socket;
      }

      server {
        listen 443;
        proxy_connect_timeout 1s;
        proxy_timeout 3s;

        proxy_pass $name;
        #proxy_protocol on;
        ssl_preread on;
      }

      log_format basic '$ssl_preread_server_name $remote_addr [$time_local] '
         '$protocol $status $bytes_sent $bytes_received '
         '$session_time "$upstream_addr" '
         '"$upstream_bytes_sent" "$upstream_bytes_received" "$upstream_connect_time"';

      access_log /var/log/nginx/stream.access.log basic;
      error_log /var/log/nginx/stream.error.log;

}
server {
    listen        80;
    server_name   forwardproxy.example.com;

    proxy_set_header    X-Real-IP          $remote_addr;
    proxy_set_header    Host               $host;
    proxy_set_header    X-Forwarded-Proto  $scheme;
    proxy_set_header    X-Forwarded-For    $proxy_add_x_forwarded_for;
#    proxy_set_header    X-Forwarded-Host   $host;
#    proxy_set_header    X-Forwarded-Server $host;

    location / {
        proxy_pass              http://unix:/dev/shm/caddy-http.socket;
        proxy_read_timeout      240;
        proxy_buffering         off;
        proxy_redirect          off;
    }
}
{
    "admin": {
        "listen": ":3019",
        "disabled": true
    },
    "logging": {
        "logs": {
            "": {
                "writer": {
                    "output": "file",
                    "filename": "/var/log/caddy/caddy.log",
                    "roll": true,
                    "roll_size_mb": 50,
                    "roll_gzip": true,
                    "roll_local_time": false,
                    "roll_keep": 10,
                    "roll_keep_days": 90
                },
                "encoder": {"format": "json"},
                "level": "INFO"
            },
            "default": {
                "level": "INFO"
            }
        }
    },
    "apps": {
        "http": {
            "servers": {
                "httpserver": {
                    "listen": [":88"],
                    "routes": [{
                        "handle": [{
                            "handler": "static_response",
                            "headers": {"Location": ["https://example.com/"]},
                            "status_code": 301
                        }]
                    }]
                },
                "fwdproxy": {
                    "listen": ["unix//dev/shm/caddy-https.socket"],
                    "logs": {},
                    "routes": [{
                        "handle": [{
                            "handler": "subroute",
                            "routes": [{
                                "handle": [
                                    {
                                        "allowed_ports": [
                                            443, 8004
                                        ],
                                        "auth_pass_deprecated": "pass",
                                        "auth_user_deprecated": "user",
                                        "handler": "forward_proxy",
                                        "hide_ip":true,
                                        "hide_via":true,
                                        "probe_resistance":{
                                        }
                                    }
                                ]
                            }, {
                                "match": [{"host": ["example.com"]}],
                                "handle": [{
                                    "handler": "file_server",
                                    "root": "/var/www/caddy"
                                }]
                            }]
                        }],
                        "terminal": true
                    }],
                    "tls_connection_policies": [{
                        "match": {"sni": ["example.com"]},
                        "cipher_suites": ["TLS_AES_128_GCM_SHA256"],
                        "curves": ["x25519"]
                    }]
                }
            }
        },
        "tls": {
            "certificates": {
                "automate":[
                    "example.com"
                ]
            }
        }
    }
}

Systemdユニットです。User,GroupをNginxと合わせます。

[Unit]
Description=Caddy
Documentation=https://caddyserver.com/docs/
After=network.target network-online.target
Requires=network-online.target

[Service]
Type=simple
#Type=notify
#User=root
#Group=root
User=www-data
Group=www-data
#ExecStartPre=
ExecStart=/usr/local/bin/caddy run --environ --config /etc/caddy/caddy.json
ExecReload=/usr/local/bin/caddy reload --config /etc/caddy/caddy.json
ExecStopPost=/bin/rm -f /dev/shm/caddy-*.socket
TimeoutStopSec=5s
LimitNOFILE=1048576
LimitNPROC=512
PrivateTmp=true
ProtectSystem=full
AmbientCapabilities=CAP_NET_BIND_SERVICE
#AmbientCapabilities=CAP_SYS_ADMIN,CAP_CHOWN,CAP_NET_BIND_SERVICE

[Install]
WantedBy=multi-user.target

SystemdでDomain Socketを取り除いてくれない場合は手動で行います。

# /bin/rm -f /dev/shm/caddy-*.socket
Posted in Linux, Networking | Comments Off on Forward Proxy: NaiveProxy + Caddy 2 + Nginx のセットアップ

tinc VPN を古い機種に入れる

NASに入れていたWireguard-goがソケットエラーを起こしてRsyncを使ったバックアップに失敗しました。いくつかのバージョンで試したのですがどうも上手くいかないようなのでTincを使うことにしました。Wireguardと同じくTunデバイスを使うのですがこちらは少し遅くなること以外は超安定しているのは分かっているので使えるようにした手順です。

NASはDebian 8なのでOpenSSLなどのセキュリティライブラリーのメンテナンス切れです。最新のOpenSSLをコンパイルしてTincで使えるようにしました。

OpenSSLのコンパイル

今現在の最新ソース(openssl-1.1.1m)をダウンロードしてソースを展開します。

# ./config
Operating system: armv7l-whatever-linux2
Configuring OpenSSL version 1.1.1m (0x101010dfL) for linux-armv4
Using os-specific seed configuration
Creating configdata.pm
Creating Makefile

**********************************************************************
***                                                                ***
***   OpenSSL has been successfully configured                     ***
***                                                                ***
***   If you encounter a problem while building, please open an    ***
***   issue on GitHub <https://github.com/openssl/openssl/issues>  ***
***   and include the output from the following command:           ***
***                                                                ***
***       perl configdata.pm --dump                                ***
***                                                                ***
***   (If you are new to OpenSSL, you might want to consult the    ***
***   'Troubleshooting' section in the INSTALL file first)         ***
***                                                                ***
**********************************************************************

makemake installを実行します。

Tincのコンパイル

最新のソースをダウンロードします。互換性を考慮して tinc-1.0.36を使います。

# ./configure --sysconfdir=/etc --localstatedir=/var --runstatedir=/run \
  --with-openssl=/usr/local/usr/local/ssl \
  --with-openssl-include=/usr/local/include \
  --with-openssl-lib=/usr/local/lib

どうもNATがあると上手く接続できないようなのでDNATで655ポートをフォワードします。

Posted in Linux | Comments Off on tinc VPN を古い機種に入れる